Well, what iMovie ditched, QuickTime lovingly stuck in its back pocket. Here is how to use QuickTime video effects.
Preface
Because of their current location in iMovie, you cannot apply video effects as easily before. In fact, you can only apply them to a clip you are exporting as a Quicktime movie, a step usually taken at the end of an editing project. Let’s look at how QuickTime video effects work, then discuss a creative way to use filtered clips in an active project.
About QuickTime video filters
Quicktime, Apple’s video workhorse, lies at the heart of iMovie. It is generally the case that if Quicktime can do it, then iMovie can do it. For example, if Quicktime can play a particular video format, then iMovie can probably not only play it, but also edit it.
Quicktime is also capable of applying a variety of filters to video. These filters can do simple tasks like sharpen and blur, or they can do very complicated things like alpha gain. The filters most people would be interested in are:
• Blur will soften your footage;
• Edge detect creates outlines of the subjects in your footage;
• Emboss makes your footage look like it was carved into a sheet of metal;
• Sharpen crisps up blurry footage (as much as is possible anyway);
• Color tint will make your footage turn black and white, sepia tone, cobalt, or like it was run through an x-ray machine;
• Film noise takes modern footage and makes it look like it sat in your attic for 20 years; and
• Lens flare adds a cool looking light flare that progresses across your footage.
A Disclaimer
I assume no responsibility for your movie looking amateurish and unprofessional due to a failure on your part to apply video effects judiciously. With great power comes great responsibility. Don't emboss your whole movie just because you think it looks cool. If an effect isn't helping you tell your story, do us all a favor and leave it out.
Applying a video filter
As mentioned above, these filters can only be applied when you are ready to export a project as a Quicktime movie. This means that whatever video filter you apply will be applied to your entire movie. You can also only apply a single video filter to footage, for each time you export it anyway. That said, let’s walk through the steps for doing it:
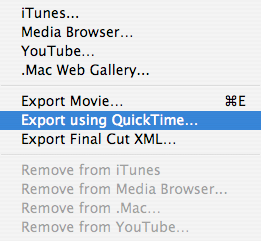
1. Export your movie as a Quicktime movie.
This is done by selecting Share-->Export using Quicktime.
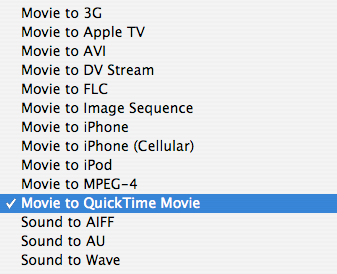
2. Select “Movie to Quicktime Movie” and click the Options button.
This setting from the Export pulldown menu is the ultimate custom Quicktime setting. All the other options in that list are basically just (very) convenient shortcuts to what you can do with this setting.
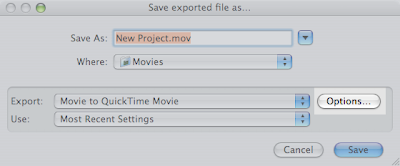
3. Click the Filters button.
This is where you’ll find the video filters discussed earlier.
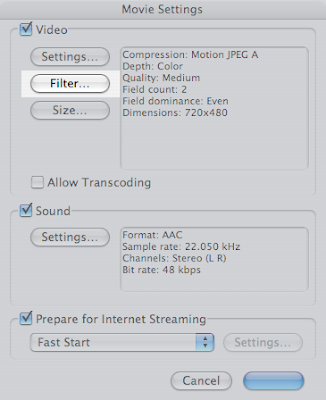
4. Select the video filter you want to apply, then click OK.
Each filter has its own settings. You can just accept the default settings, or you can adjust them to get the desired effect. The filters window provides a tiny preview window in the bottom right to help you see the results.

5. Adjust any other video or audio settings, then click OK.
Remember when I called the other export options convenient? I wasn’t kidding. If you find yourself lost with all the confusing options in this process, you’re not alone. There are some very advanced tools in here.
6. Select the name and save location for your movie, and click Save.
iMovie will go through the process of exporting your movie, including the video filter you applied. After it has finished, you can find your filtered movie in the place you told iMovie to save it.
Using Video Filters in an Active Project
What if you want to apply one of these filters to a single clip within a movie? You can’t do that by exporting the movie itself, because iMovie will apply the filter to all of your movie’s footage. The trick is to create a separate project containing just the clip you want to filter. Export this project using the steps listed above. Add the exported footage back into iMovie using the Import Movies option from the File menu. Once you’ve added the filtered footage into your Event library, just add it to the project that needed the filtered footage.
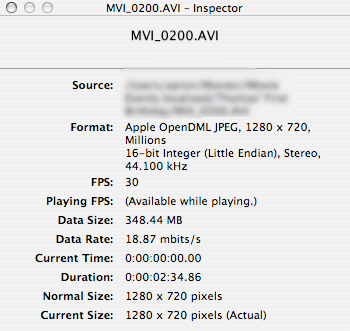
Note: When you are exporting clips to bring back into your project, you should probably export them in the format of your original footage. This can be tricky if you are unsure of what format to use, especially because this export method will overwhelm you with options. If you aren’t sure what format to use, find the original footage in your iMovie Events folder and open the footage in QuickTime player by double-clicking on the footage file. Press Command-I or select Show Movie Inspector from the Window menu. The window that pops up will tell you the video format you should use when you export the footage from iMovie.
There's a reason carpenters don't rely on Swiss Army knives.
If you find yourself underwhelmed by what you've just learned how to do, you aren't alone. The problem with Swiss Army knives, after all, is that they just barely get the job done, even when they have the right tool built in. QuickTime is great and all, but thankfully iMovie has relearned some old (and new) tricks when it comes to video effects.


5 comments:
helpful, but slightly confusing. why can't iMovie already have video effects included?
thanks for the tips, but i wish there was a quicker way.
Cab you use blur on only a small area of the video phootage?
the information provided was extremely helpful
OMG.....Thank you!!!
Post a Comment