Editor's Note: This is an updated version of an article from my previous blog: Unlocking iMovie '08.
As you become more capable in iMovie, you may want to pay attention to this option at the top of the preferences window: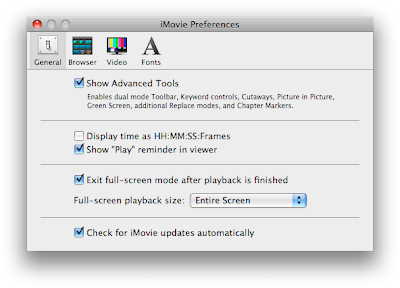 The better I get at iMovie, the more I have come to appreciate the value of the Advanced Editing tools. With just a little bit of practice, you can significantly speed up how you edit.
iMovie tells you (in tiny little type) that this checkbox enables, among other things, the dual mode toolbar, keyword controls, and direct trimming. We'll just go through each of these tools and show you how they work.
Preface: The Single Mode Toolbar
Before you ever enable the advanced editing tools, there is a lot the toolbar can already do. This is what the non-advanced toolbar looks like: I will ignore the three buttons on the right for the purposes of this post. The four buttons on the left have different effects on the footage in your Event Browser.
The first button, the edit button, is essentially an alternative to dragging clips into your project. If you select a range of footage in your Event Browser, clicking this button will add the footage to the end of your project. You can get the same result by pressing "E" on your keyboard. Once footage is in your project, the corresponding footage in the Event Browser will show an orange line running along the bottom.
The second button, the solid star, marks the selected footage in your Event Browser as a favorite. Fav-ed footage will have a green line running across the top. Hitting the "F" key will do the same as clicking the Favorite button. This editing tool is especially useful if you have a lot of footage to sort through, footage you may not want to use but don't want to delete entirely.
The fourth button (yes, I know I skipped the third one) with the big X is the Reject button. This is not for marking footage involving your deadbeat brother-in-law. Instead, this button is for getting rid of footage you never intend to use. (So maybe it is for your deadbeat brother-in-law.) The letter "R" or Delete key on your keyboard are alternatives to this button. Rejected footage has a red line running along the top. Rather than getting into the Reject button's further uses, I am going to refer you to another How To:
How to delete a video clip
The third button with the empty star (see, I knew what I was doing) is the Unmark button. If you have marked Event Browser footage as a Reject or a Favorite, this button clears that away. The letter "U" will also unmark footage.
These tools beat out anything that iMovie HD had to offer in terms of sorting footage. But their power isn't limited to making little lines across your footage. In the bottom left corner of the iMovie window, you will notice this: That pull-down menu allows you to restrict the footage you see in your Event Browser. You can see only favorite footage. You can see favorite and unmarked footage, which is another way of saying that you don't want to see rejected footage. Or you can see only the rejected footage. You can also select these different options in the View menu. There is no way to see only footage that is in your project, presumably because you can already see that footage in your project, but I hope Apple adds this view in the future because I can think of situations where it would be useful, like making changes to all of a project's source footage for use in another project.
Ready for the final cool trick? If you have one long clip with only some of it marked, you can automatically select just the marked footage by clicking on the color bar in the clip. This makes selecting marked footage a piece of cake and was a nice touch by Apple.
All of your footage markings will stay in place no matter what project you are editing, with the obvious exception that footage marked with the orange line will differ from project to project. I think it would be very cool to have project-specific favorites, but I can see how this behavior could be confusing to a user who thinks favorite footage is always a favorite. Despite that minor complaint, all of these marking tools work pretty well. And so they should, when you consider that quick sorting and editing is the central design theme behind iMovie '09.
Part I: The Dual Mode Toolbar
So all of those marking tools are available without ever enabling the Advanced Editing Tools in the preferences. Enabling them turns the marking tools up a notch with "dual mode." The advanced editing toolbar looks like this: You'll notice two additional buttons. The key button is for keywords and will be addressed below. The arrow button is just for enabling the normal selection behavior you have already become accustomed to. This button can also be enabled with the Escape key on your keyboard.
So what is dual mode? It is basically a way to mark and edit footage by simply dragging the mouse. Think of it as a set of footage highlighters. The orange highlighter will add the footage to your project. The green one will mark it as a favorite. The red one will reject it. You also have your highlight eraser to remove red and green marks. To test this out, make sure no footage is selected in the Event Browser and click the "Favorite" button. You still scrub like normal with your mouse, but if you hold down the mouse button as you scrub, the footage you drag over will be highlighted green. Let go of the mouse button and the green line remains along the top of that footage. The "Edit", "Unmark", and "Reject" buttons all work the same way. In fact, if you really want to maximize the editing speed of iMovie '08, using the "Edit" tool in dual mode is scary-fast. Welcome to the new iMovie.
As mentioned above, you can always return to the normal clip selection behavior by hitting the escape key or clicking the arrow button. The other marking tools will work like normal as long as the arrow button is selected. Dual mode does take a little practice, especially if you are still getting accustomed to scrubbing in iMovie '08. With a little practice, however, the dual mode toolbar is worth keeping enabled all the time.
Part II: Keywording
For you grammar buffs, "keywording" is a word now. After all, Apple has added "keywording controls" to iMovie '09. This takes your marking tools to a whole new level. If you click the key button in the advanced mode toolbar, you will get this floating window: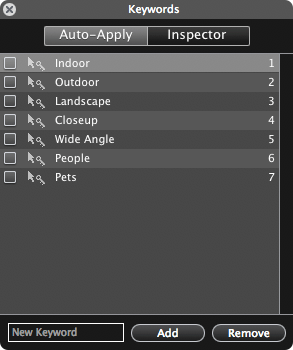
This is where you can mark up footage with specific words or phrases of your choosing. For example, say you wanted to identify all footage that contains an annoyingly exuberant soccer mom, you could add "soccer mom" to your list of keywords and mark all footage with her in it. It's footage you don't necessarily want to reject, but it certainly isn't your favorite. This is where keywords help.
Enough of the concept. How do these actually work? You'll notice in the aforementioned window that there is an "Auto-apply" tab and an "Inspector" tab. The "Auto-apply" tab works just like our highlighter versions of the other markup tools. You select the keywords you want to apply and click-drag to highlight the appropriate footage. If you want to add keywords to your list, you enter them into the text field at the bottom of the "Keywords" window.
The "Inspector" tab only works if you have already selected a stretch of footage. If you have some footage selected, it will show you what keywords have been applied to that footage and allow you to add more keywords by checking boxes or typing in the text field at the bottom of the "Keywords" window. Whether you added keywords with the "Auto-apply" tab or the "Inspector" tab, all footage with keywords applied will have a blue bar running across the top, but just under where the green favorites and red reject bars are found. This clip has a green, a blue, and an orange bar showing it is a favorite, has a keyword, and is used in my project.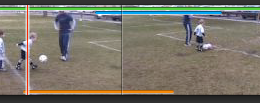
Also notice that while you cannot mark clips in your project as favorites or rejects, you can mark project clips with keywords. Doing this will also mark the corresponding footage in the event browser with the same keywords. (Remember, iMovie '09 works by referencing source footage instead of making copies of it. This is why a keyword applied in your project will also be applied to the source footage.)
Now for the really useful part. Once you have applied keywords to various lengths of footage, you can tell iMovie to only show footage that has been marked with a specific keyword. You do this by clicking on the new magnifying glass button that showed up in the bottom left corner of your iMovie window when you enabled the advanced editing tools. This button opens a pane in your Event Browser that lists all of the keywords in your selected footage and allows you to turn keyworded clips on and off with a red-light, green-light set of buttons. You'll notice that excessive shake footage is also automatically marked and can be turned off.
 Two more cool little tricks before we finish discussing keywords. In the "Keywords" floating window, you may have noticed numbers next to each keyword. You can tag clips more quickly by just typing the numbers that correspond with the proper keyword. Even cooler, if you press the number Zero on your keyboard, it will clear all keywords from the selected footage. The other cool trick is that you can organize your keywords in whatever order you want by dragging the words inside the "Keywords" floating window. Notice that the number shortcuts will always be in order, no matter how you reorder your keywords.
Conclusion: When "advanced" really means "organized"
So many of the advanced editing tools are more about efficient and convenient organization than anything else. In the end, this is what makes iMovie '09 advanced: quick editing, powerful organization, and all of this at your fingertips.
How to Use the Advanced Editing Tools
iMovie '09 Now Shipping
iLife '09 is available tomorrow at all Apple Stores, along with any number of other retail locations.
Remember, you will need the latest version of Leopard.
One other thing: I am traveling all week, so I won't be getting to work on posts until after I can get my hands on the new iMovie. If you get it before I do, please drop me an email with any questions or insight.
Who Is Randy?
The great John Moltz over at Crazy Apple Rumors Site had a really funny thing to say when Phil Schiller handed the Keynote over to a man named Randy Ubillos.
Ha-ha! Right! C’mon, Apple! “Actual engineers” aren’t stylishly dressed, handsome and deep-voiced to the point of being a voiceover actor! I bet “Randy” isn’t even really his name. I bet he’s not even an Apple employee. I’LL BET HE’S NOT EVEN UP THERE RIGHT NOW!
 Well, Randy *is* real and has done some "insanely great" stuff over the years. Now he is getting some well deserved attention. If desktop video editing is a hard-working pillar of the community, Randy is the guy who raised it to eat its vegetables, play nice, and study hard. We can largely thank him for, among other things, Premiere, Final Cut Pro, and the new iMovie. Oh and for Aperture too, by the way. With the way software development works, it's a shame we can't get to know every career that brings us great software. (The entire iMovie team is a talented bunch of people.) But as we all get ready to put iMovie '09 through its paces, it is worth taking a moment to learn about a great career that got us all here.
3/4" Tape Decks and an Apple ][
Randy's senior year in high school was marked by two seemingly unrelated events. First, Randy got his start in video editing when he ran the school's TV studio. Back then, all of his editing was done on 3/4" tape decks. He also learned all about the electronics side of television.
During that same year, Randy got an Apple ][ and taught himself to program. The following summer he earned money repairing and selling Apple ][s. I don't know if he made the connection between computers and video editing back then, but the seeds were certainly planted.
Programming took a more central role for Randy following high school, when Randy put three years into a computer engineering degree at the University of Miami. From the beginning of college, though, he was looking to what came next. During his freshman year he started a software company with a business partner and began cranking out code. He wrote everything from disk copy software ("Nibbles Away") to games, with emulators ("][ In a Mac"), spreadsheets, spell checkers, and print to disk software ("Open It") in between. The software company eventually pulled Randy away from his degree and he took up the business full-time.
"Premiering" in California
Perhaps one of the most important steps Randy took back then was the step that took him away from his company. Feeling isolated as the sole programmer and frustrated with his partner's management, Randy decided to head west to California, taking a job with Activision. Only four months after his arrival, the company decided to close down the division where Randy was hired and move him to a new project.
In spite of Activision's interest in keeping him, Randy left in 1990 and went to a small company called SuperMac. There he was asked to create video editing software to go with a video recording/playback card called "Digital Film". The software he wrote was called "Reeltime", but you know it today as Adobe Premiere. (Adobe bought the platform shortly before the final version shipped.)
KeyGrip
Randy stayed with Adobe for four years, writing and leading development of Premiere up through version 4. During his time there, he had built up a reputation for his creativity and dedication to a good idea. It was this reputation that prompted a phone call from a board member at Macromedia. The call led to dinner with Bud Colligan and John Doerr, Macromedia's founders. They wanted him to join them in creating a new video editor from the ground up. It was an offer Randy couldn't turn down.
Internally, the project was called KeyGrip, and it was remarkably ambitious. Of all the lofty intentions, perhaps most importantly it was going to take pro level features and make them available on normal desktop computers. While the software was still in Alpha stages, Randy demoed it to Steve Jobs, who had recently rejoined Apple. By then the software was renamed to Final Cut, and Apple decided to buy it.
Better Ways of Doing Things
Randy's tenure at Apple has been remarkable. Shortly after joining the company, he was named a Distinguished Engineer, a designation freeing him to focus on the technology he wanted to develop. After years of leading development on Final Cut Pro, Randy decided that pro photographers needed a professional tool for organizing their digital photographs. (After all, the rest of us had iPhoto!) So Aperture was born.
Following Aperture, Randy turned his attention to iMovie. Home editors, he decided, were leaving too many memories untouched because editing them took too long. (Steve Jobs described it this way when he first announced iMovie '08.) He took a basic version of the software he had written and used it to run through several hours of footage for some friends. Using the new skimming ability, he turned a rough cut around in about 30 minutes. Their stunned response told him he was on the right track. iMovie '09 has come a long way from that early concept, thanks not just to Randy but to an entirely talented and hard-working iMovie team.
All of Randy's ideas seem to stem from his passion for finding a better way of doing things. His passion for photography and videography, fueled by his love for travel, has made him keenly aware of the struggles we all face in capturing the moment. The tools make the difference, and the craftsman in Randy gets that.
So the next time you get a smile from Grandma and Grandpa as they enjoy Junior's first steps, tip your hat Cupertino's way. Inside the Infinite Loop, Randy and all the other talented people at Apple are are feverishly working on the next amazing thing.
Quick Look: More on Image Stabilization
 Randy from the iMovie team read my recent post on image stabilization and wanted to pass on some other things that are worth knowing about the way it works in iMovie '09.
Not Just a Zoom
The stabilization feature in iMovie '09 does more than just a simple zoom, which could be understood from my original post. iMovie primarily rotates and moves each frame to keep the objects all the in same place, which is quite a bit more sophisticated. Once the frames are moved and rotated, iMovie applies the amount of zoom necessary to cut off the black edges created by the correction. I suppose this could still be called a corrective zoom, but Randy's explanation is a lot more clear.
Two Things That Might Look Worse
In the same way shaky video can obscure what you want people to see, it can also hide things that you'd rather keep hidden. Once iMovie works its magic on your shaky footage, there are two other visual problems that will become much more noticeable.
Motion Blur
Unless you have a camera that shoots at really high framerates, it is possible to swing your camera around enough that the pixels will actually become blurred. Although iMovie can stabilize the frames relative to each other, it can't erase the blurriness of individual frames. Stabilized footage with blurry frames might look like the camera is moving in and out of focus.
CMOS Jello
If you are shooting video with a CMOS camera, like the new Nikon D90, your video is being shot with a rolling shutter, which means the sensor data reads from the top of the sensor to the bottom over a (very short) period of time. If the camera is moving during shooting, the results of a rolling shutter can make the world look like it's suddenly made of jello (link via Daring Fireball). Randy notes that stabilization can make the jello stand out and look especially jiggly. Because the overwhelming majority of video cameras and still cameras that shoot video use CCDs rather than CMOS sensors, most cameras will not suffer from the jello problem.
See It in Action
Randy was kind enough to send a link to some of his Africa footage that he used in the Macworld keynote. For the curious, he filmed with a Panasonic SD-5 (a CCD-based camera). Everything was shot hand-held, no tripods, and was later stabilized and edited in iMovie. Thank you, Randy, for the great information. It looks like it was a great trip!
How to Store your Projects and Event Footage
Now that iMovie '09 allows you to move projects in addition to events (where before you could only move events), it does raise important question: Where do you keep all of this stuff? Archiving digital footage, especially HD footage is not a trivial thing. Storage options are still catching up with the needs of the home videographer.
There is a lot of debate over tape vs. hard drives. I found a nice, detailed analysis (PDF Link) by Ian Simpson of the Wollongong Camera Club reviewing all the ways to archive your footage. But, exporting to DV tape seems to still be missing in iMovie '09, as it was in v. '08. This makes the debate largely moot for iMovie '09 users. So, are there reasonable ways to store iMovie projects and events on disks?
Recordable DVDs
If you don't care to preserve the editability of projects, DVDs can be a decent option, especially if your source footage is 480p or lower quality. (This is probably the case as long as you aren't shooting in any flavor of HD.) But I am serious when I say you can't care about editability. DVD footage is compressed using the MPEG-2 codec, a format not designed for editing. Ripping the DVD later to edit its footage will lead to a very noticeable reduction in quality.
Also, be warned that DVDs may not last as long as you would like for a whole host of reasons. David Pogue recently found this out the hard way. The National Institute of Standards and Technology produced an extensive review (PDF link) of recordable CDs and DVDs as a reference guide for librarians. However, from all I have been able to discover, the jury is still out on the longevity of recordable DVDs. Even if you do things right, there are enough variables in the standard home that could cause your DVDs an untimely demise.
One other point to make about DVDs is that iMovie now lets you move projects while collecting and making copies of the event footage that goes with it. Theoretically, you could use DVDs to store editable footage, as long as the size of the project and its event footage together doesn't exceed the capacity of the disk.
Hard Drives
So what if you just want to keep your projects and event footage on hard drives? There are actually a lot of advantages to this approach, the most significant being convenience. On a hard drive, the files are always ready to go. iMovie can work off external drives as easily as internal ones, and working from multiple external drives is not generally a problem.
But all of us know someone who had a drive go bad. (This makes Time Machine one of the single best things a home computer can have. Don't have Leopard? Plan on the upgrade if you want to use iMovie '09. The software requires it.) How do we reliably store all of this data on hard disks?
Back up! Failing to back up your drives is the best way to insure you will lose something important. External storage prices are going down rapidly and it is easy to find good deals. Time Machine makes backup incredibly easy, so just plan on having at least two copies of everything precious to you.
But hard drives are almost guaranteed to go bad by 5-7 years. This means that you shouldn't plan on buying one drive for life. Think of your data as a moving target. It may stay in one place for a few years, but anything longer than that should make you nervous. Also, be sure to store your drives in cool, dry places as much as possible.
One More Thing: What If My House Burns Down?
It sounds like a funny question, but it is a real concern. Offsite backup is a great practice for this very reason, but may not be feasible for the typical home user. Online backup services aren't yet a reality if you are copying hundreds of gigabytes of data. Luckily, there are disaster-proof options worth looking into. This one from ioSafe even seems reasonably convenient and inexpensive. The truth is, if you don't have a home safe you should be considering one anyway.
The Moving Target Theory
The sad and ultimate truth is that there are no perfect storage options for a typical iMovie user. But this should come as no surprise to you if you ever thought that Zip drives were amazing. (Hey, at one time they really were!) Technology simply moves too quickly for us to find a reliable, long-term solution. So the optimal strategy really seems to be the Moving Target Theory. Keep your data in multiple places and don't plan on storing it in any one medium for more than four to five years. I know this seems daunting if you are shooting enough footage to make a librarian of Congress nervous, but you may not have any other options.
Quick Look: Image Stabilization
This post has some updated information you can read here.
One of the remarkable new features in iMovie '09 takes the shaky, handheld video we all shoot, and makes it look like you lugged a steadicam around Disneyworld with you. In previous versions of iMovie, you'd have to buy a third-party plugin for this sort of thing. Despite having to wait a few more weeks before we can all put iMovie '09 to work, there are some things we know about its image stabilization effect that are worth mentioning.
Corrective Zoom
The stabilization feature in iMovie '09 works by applying a corrective zoom. If you look at this screen grab from Apple's tutorial video, you can see that the stabilized video has zoomed in on the scene. The dead tree in the middle of the shot is closer, and the trunk of the large tree on the right has been pushed out of the shot. A corrective zoom works by trimming the shake off the edges of each frame, preserving just that which can be seen in all of the frames.
This means there will inevitably be shaky footage that iMovie can't correct. (If I wildly swing my camera around, all the zooming in the world can't correct that amount of motion.) Exactly how far in iMovie is willing to zoom is something we will have to wait and see.
From what I've been able to tell, the zoom that iMovie applies will only ever be the minimum necessary to stabilize the shot. If I select a range that is relatively stable, the zoom will be slight. If I add footage to my range that is shakier, iMovie will zoom in even more. This is the reason that iMovie doesn't preview the stabilization effect while you skim your footage in the event browser. Without knowing the start and end point you have in mind, iMovie doesn't know how far to zoom in. Clips added to your project don't have this problem.
Processing Time
iMovie has to analyze footage in order to apply the stabilization. Apple has warned all of us about this several times already, but I don't know exactly how long it takes for a given length of footage. I would image it's long enough that you may want to take a break from you Mac when you set it to process.
The nice thing is that this processing time is voluntary (unlike thumbnail generation). If you don't want to stabilize your all of clips, you don't have to. You simply select either the clip or the entire events you want processed, then tell iMovie to get to work with a menu command. After it is done, iMovie '09 will also mark footage that is too shaky to correct, saving you the time of adding it to your project.
Most of the quality in home video projects comes not from the flashy effects, but from the little things like lighting, sound, and the steadiness of the shot. The fact that iMovie '09 fixes one of these issues so simply is really impressive.
iMovie '09 and Previous iMovie Versions

I recently was asked about iMovie '09's compatibility with previous versions of iMovie, including compatibility with iMovie '08. (Thanks for the question, Ana.)
Here are four things to know about the compatibility issues you can expect when upgrading.
iMovie '08 to iMovie '09
1. All of your event library footage from iMovie '08 will work in iMovie '09 without a hitch. There will be some processing time required to use the video stabilization feature. But even when that processing is done, event footage in iMovie '09 will still be backwards-compatible with iMovie '08.
2. Projects in iMovie '09 are *not* backwards compatible with iMovie '08. This means that when you upgrade, you will not be able to transfer your projects to a computer running iMovie '08 and edit those projects there. As I understand it, iMovie '09 projects won't even show up in iMovie '08.
iMovie HD (and previous) to iMovie '09
3. iMovie HD projects imported into iMovie '09 work the same as when you import them into iMovie '08. This means that any transitions, effects, titles, themes, and audio edits will probably be lost. You will just get the clips in your project edited to the lengths you cut them in iMovie. (Still images added to your iMovie HD project also make the trip.) These clips are added to your event browser in a new event, and iMovie '09 creates a project with the same name containing the clips in the identical order and length.
4. If you want to import a fully edited iMovie HD project, you can do this if you export your movie as a Quicktime file first. (I recommend using the Apple Intermediate Codec.) Once you have your Quicktime file, select "Import Movies" from the File menu and select the Quicktime file you exported. iMovie '09 will add the movie as an event, which you can then add to a new project you create. Be aware that you will not be able to change any of the edits you made in iMovie HD.
If there is one very Jobsian lesson in all of this, it's that you shouldn't plan on looking back. Luckily, the future looks good with iMovie '09.
What to Expect in iMovie '09
There are a lot of changes in iMovie '09, more than Apple showed in the keynote at Macworld Expo yesterday. Some new things they showed, but only in passing. Here is a list of the especially interesting changes:
Chapter Markers
Let the rejoicing commence! iMovie can now do custom chapter markers. None of the old workarounds are necessary any longer. The markers are actually really cool and easy to use. They are easy to move and to name. Not only did Apple restore this feature to iMovie, but they have done the best implementation of chapter markers yet.
Then, best of all, you can tell iMovie to send it straight to iDVD. No more wandering through the Media Browser first.
But the enhancement doesn't stop there. You can now insert reference markers as well. These are great for editing purposes, because they help you mark and later find the spots that need constant attention. For example, you can mark a beat in your music track and iMovie will then snap edits to the beat marker for you.
Event Date Editing
If you imported old family VHS tapes, your event dates told you that little Jimmy was born last week (when in reality he is asking to borrow the car). You could've tried this trick, but it was tedious and didn't always work. In iMovie '09, you can edit event dates directly and simply in iMovie.
Projects Go Where You Want Them
In iMovie '08, your projects had to live on your startup drive, and moving them somewhere else manually would keep iMovie from recognizing them. Now you can save projects onto external drives. You can even pick a project and tell iMovie to gather all the event footage to one place, which makes it incredibly easy to move to other computers.
Fast/Slow/Reverse
I did a poll on the old blog asking about the special effect users missed the mot. Fast/Slow/Reverse was the most requested by a mile (over 80% of respondents wanted it back). It's back and works really, really well. And, in true, new iMovie fashion, there is no rendering.
Green Screen
If you watched the keynote, you might have noticed Randy mention a green screen option. You need to have shot against a real green screen, but that's something a bucket of paint can provide.
The list of changes in iMovie '09 goes on and on, well beyond this list. We will be giving them all a full treatment once iMovie ships. Until then, there is a lot to look forward to.
A brave new world...
Welcome! Most of you probably found your way here from my old site: Unlocking iMovie '08. Well, the times, they are a' changin'. iMovie '09 was just announced minutes ago by Phil Schiller with help from the chief architect of iMovie, Randy Ubillos. (I've actually had the opportunity to meet Randy, and he is amazing. How many of you have won an Emmy?)
iLife '09 doesn't ship until the end of the month, but that doesn't mean we can't get ready for it.
So here is the redesigned website to go with the new iMovie. If you are new here, you will find tutorials and tips on using iMovie '09. A lot of the discussion will be especially useful to those who spent a lot of time in iMovie HD and other previous versions.
I have transferred some of the articles I guessed would be relevant, but those will most certainly require some additional changes as I learn how to use the new iMovie.
As always, please comment or email me any questions or concerns you may have.
How to use the Space Saver
No doubt about it, the Event Library makes iMovie better in the same way that drawers and cupboards make kitchens better. Having your footage conveniently organized and accessible makes a huge difference in your productivity. The problem with kitchen drawers, though, is the infernal junk drawer. It's never fun to clean out, but who really needs the dead batteries and gum wrappers that fill it up?
The Event Library can get filled up with all kinds of junk: blurry shots, shaking shots, long and boring shots. The problem is that this kind of stuff takes up a lot of space, especially if you are shooting HD. You can get rid of it by rejecting and deleting each individual clip, but this can be time consuming. iMovie, in its wisdom, gives us a faster way: Space Saver.
WARNING: Space Saver risks getting rid of footage you want to keep. Using the junk drawer analogy, it works by picking out the things you want to save then just shoving everything else into the trash. There might be a ten dollar bill or important phone number that you'll never get back. That said, here is how to use the Space Saver.
You'll find the Space Saver in the File menu.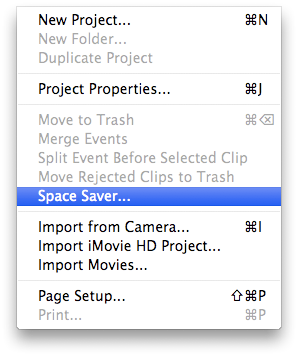
Before you select it, it's important to understand that Space Saver only works on events that you have selected in the Event Library. You can go an event at a time, not unlike going a drawer at a time in your kitchen. Or, you can select multiple events at once and run Space Saver on all of them together.
I realize that my warning may scare you from doing anything with Space Saver, but iMovie actually takes you through a few steps before anything really gets deleted. If you select "Space Saver" from the File menu, you will see this dialog box show up: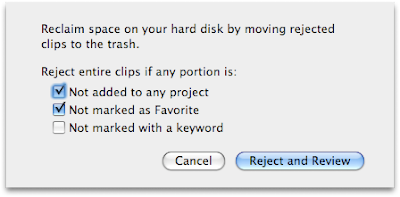
What it basically tells you is that Space Saver can delete any footage that:
1) Isn't used in a project,
2) Isn't marked as a favorite, and/or
3) Isn't marked with a keyword.
This essentially means that it will delete any footage that you haven't touched using any of the tools described in this post:
How to use the advanced editing tools
So if you want your footage to be saved from the Space Saver, go read that post and learn how you can make sure the right stuff gets passed over for deletion.
Depending on the criteria you select in the dialog box, iMovie will delete more or less of your footage. After you have click the "Reject and Review" button, it marks all the deletable footage as rejected and changes your view of the Event so that you only see the rejected footage. Click "Move Rejected to Trash" and iMovie cuts out the rejected footage from the event and moves it into the trash in the Finder. This last part of the process works just like the process covered in the post:
How to delete a clip
If you want to undo the Reject marking that Space Saver applied, don't bother unmarking all the footage. Just hit Command-Z, and iMovie undoes what Space Saver did.
Have fun with all that free space!
Reader Tip: Use Shift-Arrow to set start and end points
I've said it before and I'll say it again, I love the keyboard shortcuts in iMovie '09. Michael Avory sent me this tip on using Shift and the arrow keys to mark start and end points of a clip while you are editing. I love the trick because if I am being slow and methodical about selecting a particular range of footage, I don't have to keep holding my mouse button down as I drag. It also works great because it means you can select footage during playback, no dragging required.
Anyway, take a moment to try out Michael's great tip:
Here is a tip for setting IN/OUT points that might interest you:
Make sure clip is not selected (no yellow frame). Play/drag to IN-point (pause), hit shift + left arrow (IN is marked) Play/drag to OUT-point (pause), shift + left arrow and the clip is selected from IN to OUT. To select a portion of clip up to a specific point: play/drag to point, hit shift+left arrow, place cursor at start of clip, shift + left arrow and the clip is selected up to your first chosen point.
These are very useful for editing clips to the beat of a music track, etc.
How to Recreate Bad Thumbnails
Sometimes iMovie '09 chokes on a bit of footage and, as a result, coughs up some bad thumbnails as a result. The iMovie interface doesn't provide an easy way to recreate these, so we have to delete the old thumbnail files to induce iMovie to make new ones. (iMovie automatically knows if thumbnail files for a clip are missing, and will create the missing ones every time it launches.)
This all means we have to go folder diving in the Finder to fix the problem. There are two potential locations for bad thumbnails.
Normal iMovie Events
In iMovie, right-click (or hold the Control key and click) on the bad thumbnail clip in the Event browser.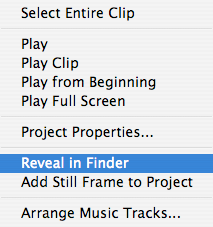
Select "Reveal in Finder" and it will take you to the folder containing all of that event's footage, as well as a folder called "iMovie Thumbnails." Go into the thumbnails folder.
Once you are there, you can move any of these Quicktime files to the trash, and iMovie will just recreate them. Be sure that you are deleting clips in the "iMovie Thumbnails" folder. If you delete clips from the event folder itself, you will lose your original footage. To be sure you have deleted the right stuff, just move the thumbnail files to a different location. iMovie will still make new files, and you can delete the files you moved after the new ones have been created.
Relaunching iMovie will cause it to create new thumbnails.
iPhoto Videos
iMovie conveniently looks into your iPhoto library and includes video clips from iPhoto in your Event Library. This is great if you want to include any footage you caught with your digital still camera. If iMovie created some bad thumbnails for clips in iPhoto, we have to take a different approach.
In the Finder, go to your Pictures folder in your home folder. Right-click on your iPhoto library and select "Show Package Contents." A new window opens with all of the stuff found in your iPhoto library.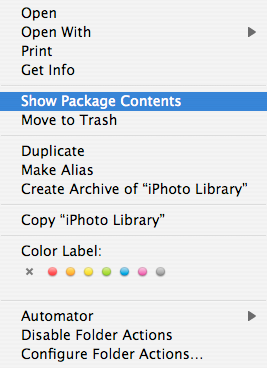
Open the folder called "Data" then open the folder for the year the video clips were taken. Next open the folder for the date the video clips were taken.
In this folder you will find a Quicktime movie and a JPEG file for each video clip associated with this date. Move to the trash just the Quicktime movies for each clip that had bad thumbnails. (Don't delete the JPEG file, or iPhoto will have trouble displaying the video clip in its own window.) Relaunch iMovie and it should recreate the thumbnails.
Just a few other things. If you need access to the original files in the iPhoto library, they are stored using the same folder names (year and date), but inside the "Originals" folder instead of the "Data" folder. Also, you can quickly go straight to the original video clips from iMovie by right-clicking the clips and selecting "Reveal in Finder."
How to Capture a Still Frame
In a past post on the old blog, we put QuickTime to work in order to resurrect the creation of still images from video clips. It was a semi-complicated process, but a very powerful and flexible one at that. But you may not want powerful. You just want easy. Here's easy, thanks to the change in all versions of iMovie since v.7.1.
Skim your playhead to any point in a video clip that you want to capture as a still image. Right-click and choose "Add Still Frame to Project" from the menu that pops up. iMovie automatically creates a still frame and ads it to the end of your project. (If you have a one-button mouse, hold down the Control key and click to get the same menu.)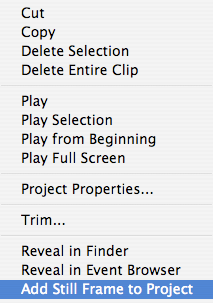
If the image was created from an Event library clip, iMovie will auto-apply the Ken Burns effect. If it was created from a clip sitting in a project, iMovie will leave the Ken Burns effect out so your image sits statically in the frame. (This is pretty intelligent behavior. If I am creating a still from a project, I probably want it to be a freeze-frame of the clip I am working on, not a "Ken Burnsed" image.)
Now here's the really handy part. If you want access to the image for other purposes, like adding to iPhoto, right-click on the image that iMovie created in your project and choose "Reveal in Finder."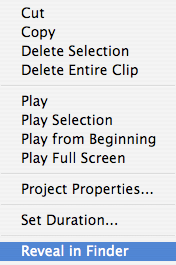
There it is, sitting in a folder that is hidden inside the project package file. You'll only get JPEGs, but these should work fine for most people. If you want more options for still image exports, go read my original post on this subject.
How to Use the Fine-Tuning Controls
If you find that you want to add just a few frames to the beginning or end of your clip, Fine Tuning makes this quite a bit easier. In the bottom corners of a clip, there is a button with a line that has two arrows on either side. You can see the buttons I am talking about in the bottom corners of this clip.
When you click on either button, an orange border wraps around that end of the clip. This border comes with a draggable handle.
Go ahead and drag the handle. As you do, you will see iMovie counting the frames that you add or remove from your movie, together with the Viewer window showing the footage you are adding. Pretty dang handy.
One other tip: if you hold down Command-Option as you mouse around in your project, you will see the Fine Tuning option pop up without the need to click the little buttons.
Quick Tip: Cut or Add Frames with a Keystroke
This is a great feature in iMovie '09. You can quickly cut or add frames to a clip in your project by doing the following:
1. Hover your mouse cursor over the clip you want to edit. (If you hover near the beginning of your clip, you will be cutting or adding to the beginning. If you hover near the end of your clip, you will be editing the end.)
2. Use the right or left arrow keys while holding down the Option key.
If you are adding frames, you will see it working as the clip grows beyond the yellow selection outline. If you are cutting frames, the yellow outline will still cover the entire clip.
How to Use Quicktime Video Effects
If iMovie is a Boy Scout, QuickTime is the Swiss Army knife. Where iMovie's powers fall short, the built-in QuickTime features take up the slack. I have used it for a few different workarounds on this blog. Well, it's time to add one to the list.
Well, what iMovie ditched, QuickTime lovingly stuck in its back pocket. Here is how to use QuickTime video effects.
Preface
Because of their current location in iMovie, you cannot apply video effects as easily before. In fact, you can only apply them to a clip you are exporting as a Quicktime movie, a step usually taken at the end of an editing project. Let’s look at how QuickTime video effects work, then discuss a creative way to use filtered clips in an active project.
About QuickTime video filters
Quicktime, Apple’s video workhorse, lies at the heart of iMovie. It is generally the case that if Quicktime can do it, then iMovie can do it. For example, if Quicktime can play a particular video format, then iMovie can probably not only play it, but also edit it.
Quicktime is also capable of applying a variety of filters to video. These filters can do simple tasks like sharpen and blur, or they can do very complicated things like alpha gain. The filters most people would be interested in are:
• Blur will soften your footage;
• Edge detect creates outlines of the subjects in your footage;
• Emboss makes your footage look like it was carved into a sheet of metal;
• Sharpen crisps up blurry footage (as much as is possible anyway);
• Color tint will make your footage turn black and white, sepia tone, cobalt, or like it was run through an x-ray machine;
• Film noise takes modern footage and makes it look like it sat in your attic for 20 years; and
• Lens flare adds a cool looking light flare that progresses across your footage.
A Disclaimer
I assume no responsibility for your movie looking amateurish and unprofessional due to a failure on your part to apply video effects judiciously. With great power comes great responsibility. Don't emboss your whole movie just because you think it looks cool. If an effect isn't helping you tell your story, do us all a favor and leave it out.
Applying a video filter
As mentioned above, these filters can only be applied when you are ready to export a project as a Quicktime movie. This means that whatever video filter you apply will be applied to your entire movie. You can also only apply a single video filter to footage, for each time you export it anyway. That said, let’s walk through the steps for doing it:
1. Export your movie as a Quicktime movie.
This is done by selecting Share-->Export using Quicktime.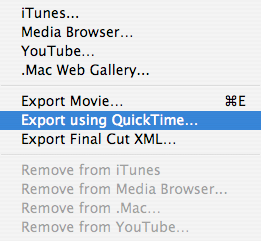
2. Select “Movie to Quicktime Movie” and click the Options button.
This setting from the Export pulldown menu is the ultimate custom Quicktime setting. All the other options in that list are basically just (very) convenient shortcuts to what you can do with this setting.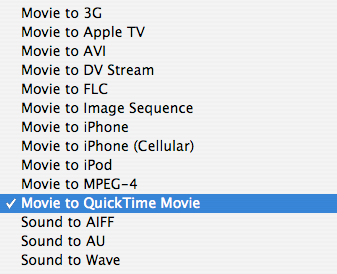
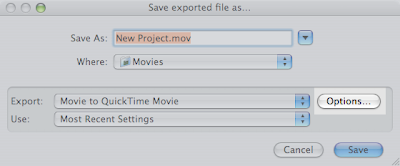
3. Click the Filters button.
This is where you’ll find the video filters discussed earlier.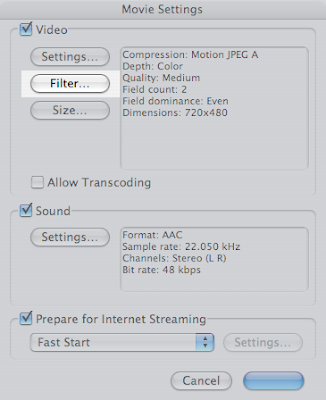
4. Select the video filter you want to apply, then click OK.
Each filter has its own settings. You can just accept the default settings, or you can adjust them to get the desired effect. The filters window provides a tiny preview window in the bottom right to help you see the results.
5. Adjust any other video or audio settings, then click OK.
Remember when I called the other export options convenient? I wasn’t kidding. If you find yourself lost with all the confusing options in this process, you’re not alone. There are some very advanced tools in here.
6. Select the name and save location for your movie, and click Save.
iMovie will go through the process of exporting your movie, including the video filter you applied. After it has finished, you can find your filtered movie in the place you told iMovie to save it.
Using Video Filters in an Active Project
What if you want to apply one of these filters to a single clip within a movie? You can’t do that by exporting the movie itself, because iMovie will apply the filter to all of your movie’s footage. The trick is to create a separate project containing just the clip you want to filter. Export this project using the steps listed above. Add the exported footage back into iMovie using the Import Movies option from the File menu. Once you’ve added the filtered footage into your Event library, just add it to the project that needed the filtered footage.
Note: When you are exporting clips to bring back into your project, you should probably export them in the format of your original footage. This can be tricky if you are unsure of what format to use, especially because this export method will overwhelm you with options. If you aren’t sure what format to use, find the original footage in your iMovie Events folder and open the footage in QuickTime player by double-clicking on the footage file. Press Command-I or select Show Movie Inspector from the Window menu. The window that pops up will tell you the video format you should use when you export the footage from iMovie.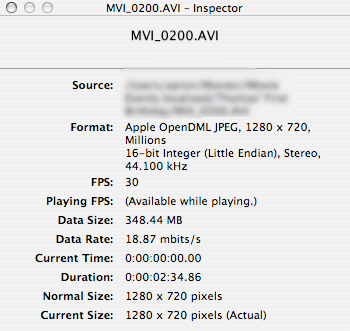
There's a reason carpenters don't rely on Swiss Army knives.
If you find yourself underwhelmed by what you've just learned how to do, you aren't alone. The problem with Swiss Army knives, after all, is that they just barely get the job done, even when they have the right tool built in. QuickTime is great and all, but thankfully iMovie has relearned some old (and new) tricks when it comes to video effects.
Reader Tip: Create Video Masks
New feature time! We have How To's (the long ones) and Quick Tips (the short ones) but we need another category. See, I have a list of reader-contributed tips that deserve sharing. To make sure no one thinks I came up with these great tips, we are giving them their own category. I'll be posting more of these over the coming weeks and months.
The tip today comes from Karel Gillissen. He figured out that you can add images over top of video clips. Mix in some transparency, and you get masks!
Karel has taken his tip to a whole new level and posted videos of how the process works. To keep his .Mac account from getting kicked too hard, I have posted his walkthrough below. He shows how he creates the mask using Photoshop Elements, then how he adds it over top of a video clip. (Just drag and drop! I love it!) Check it out, because this is a very cool trick.
Karel then shows us that with video masks you can do all kinds of cool things. Duck hunt, anyone?
Quick Tip: Moving, Lengthening, and Spanning Titles

Titles work really well in iMovie '09. Previous versions of iMovie had to render titles when you added them, taking a lot more time than the instant placement you get in '09. But there is more to iMovie '09 titles than just the speed.
Moving titles
First, you can place titles wherever you want in your movie with pinpoint accuracy. Once a title has been placed in your movie--represented by a blue flag running above your clip, you can drag that title to any point in the movie. This is even true of titles "over black". In iMovie HD, you'd have to split a clip at the point you wanted a title to enter, then add the title to the second half of the split clip.
Lengthening titles
Another really nice feature of '09 is the ability to lengthen or shorten a title quickly. Simply grab the end of a blue title flag by clicking on the end with your mouse and drag the title to lengthen or shorten it. In iMovie HD, you'd have to select the rendered title footage and readjust and rerender the title, guessing at the right length with each render. This new way is much faster and easier.
Spanning titles
By either moving a title or lengthening a title, you can get a title to stretch across multiple clips. In the case of lengthening, you'll notice that you can drag the end so it runs across as many clips as you like, with no rendering! (You just can't span a title across another title.) Very handy and much faster and more accurate than iMovie HD.
Quick Tip: Full Screen Scrubbing
The full screen preview in iMovie '09 is excellent. Here are a few quick tips on drawing out all of its power.
You can enter full screen mode either by selecting the "Play Full Screen" from the View menu, or by clicking the full screen button below your project or event footage.
The button you want is the darkened rectangle with the arrow inside it. There are two of these, one under your project and the other under your Event Browser.
Once you are in full screen mode, you will immediately notice that if you move your mouse around, a clip navigation shows up across the bottom of the screen.
(Click to enlarge.)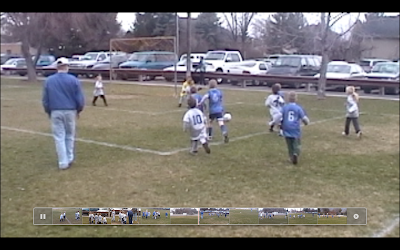
This navigation bar will ignore your mouse movements until you click on it. Once you have clicked on it, dragging your mouse across the bar will scrub just like it does when in the normal iMovie window.
If you have scrubbed to a given point in full screen mode, and want to begin normal playback from that point, just hit the space bar. (Clicking a second time on the navigation bar does not disable the scrubbing ability.) Alternatively, you can move your mouse cursor straight up so it no longer runs across the clips in the navigation bar, then move your cursor over to click the play button.
One other really nice feature is being able to restrict full screen playback to the correct resolution of your footage. Because most of us are editing footage that is lower resolution than our computer displays, a full screen preview will make your footage look worse because it upscales it to fill the screen. If you want to see what your footage looks like in its natural dimensions, go into the iMovie preferences and select "Actual Size" from the drop-down menu selecting full screen playback size.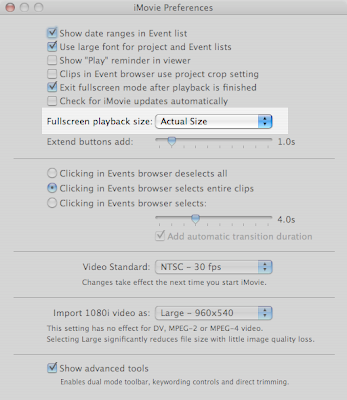
Now your footage will display at its actual quality.
The more I delve into iMovie '09, the more hidden gems I find. If you have found any hidden gems, please send them my way or share them in the comments.
How to Customize Your Interface
Getting used to the new iMovie interface was a challenge for me. I have spent enough time in the new version of iMovie to feel very comfortable. But it wasn't always that way. This is what I said on the old blog:
Love it or hate it, the iMovie HD interface was always the same. The preview window was always large, often larger than necessary. The clips pane was always three clips wide, which meant for a lot of scrolling if you had too many clips. If you had a large project in your timeline, the only way to see it all was to shrink it to the point it was useless to try to make accurate edits to it.
The funny thing is, I thought I loved it. I always knew where I was and what I was doing. The reality is, I just didn't know things could be different, or, for that matter, better. When I first got into the iMovie '08 interface I felt like someone moved all the rooms around in my house. Just like how I can stumble into the bathroom in the middle of the night, I could move around in iMovie HD without putting much thought into it. In iMovie '08, I was stumbling into walls.
Then I started playing around, and that's when it hit me: I can put stuff just about wherever I want it. It's like moving the door to the bathroom right next to my bed (or even better, next to my three-year-old's bed) then putting it back when I am done. Talk about power. Here is how you customize your interface.
There are going to be a lot of full-size window captures for this one, so when you see an iMovie window, click on it to get the full view.
The default
This window is what most of you are now seeing in iMovie '09:
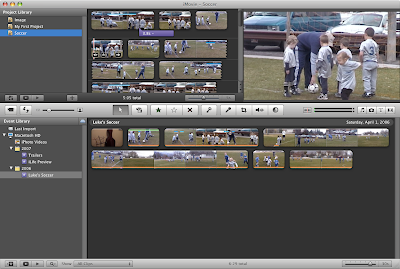
This really isn't a bad way to start. What you should notice if you are coming from iMovie HD is that your preview window is really small, much smaller than you are accustomed to. But think about it, did you really need to see your footage that closely? Probably not, especially because there was always the full screen preview. (It was like ordering food in America. "Did you want that extra large or super extra large?") When scrubbing through your rough footage, smaller is better because...
Now you can see more of your footage at once. Notice how the Event Browser takes up a full two thirds of the window. All the more room to see where you have been and where you am going. This isn't a big deal if you have twenty minutes of footage, but what if you have 300 minutes? It makes a lot more sense to have your rough footage get the lion's share of window real estate, for now at least. Sure the project window is small as a result, but it's big enough for me to drop footage into. At the start of making my movie, that is all I need it to do.
Trading Places
So what happens when my project is getting too big for comfort? Editing a large movie in something the size of a playing card only invites frustration. There are two ways to deal with this.
If I am the kind of person that always wanted timelines to run vertically--so I can feel like I am skydiving--I can just drag on any part of the middle toolbar not occupied by a button or slider and drag that bar downward. (I could also drag it upward if I wanted more room for my source footage.) Dragging the toolbar gives me this:
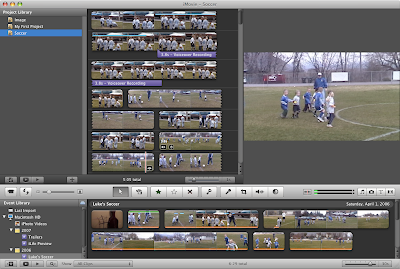
Probably not the improvement you were hoping for. Method number two of granting more real estate to your project will get the job done much better. On the middle toolbar, you will see a button with facing, curved arrows. Go ahead and give it a click.

Voila. Now all that space that was dedicated to your Event Browser appears to be not so dedicated. This is the kind of room you can really use to dig into your project with transitions, additional edits, and audio tracks.
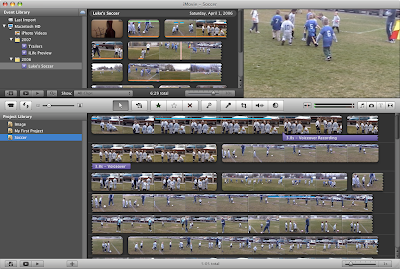
This space becomes even more useful if you use the "Trim..." feature to re-edit clips within your project. All of this and a cool animation to boot. (Can't get enough of watching your project flushed to the bottom of the window? Hold down the Shift key while you click the button. Slo-mo!)
Now you see it...
There is even more room to capture, for either my project or my source footage. What's up with those lists, either my project list or my events list? If everything I want is in a single event, and the only place it's going is into a single project, then why keep those lists in view? Click the little star-page button below either your events list or your project list.

Ahhhhhhh. Now we can really stretch out.
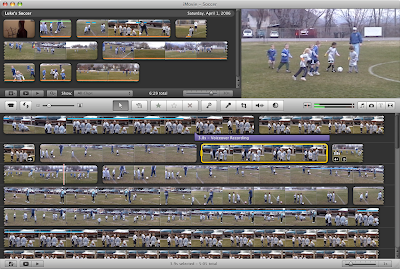
Of course, the same buttons will bring your lists back.
When things are big that should be small*
So what if something is big and you want it smaller? What if something is small, and you want it bigger? Let's make it happen.
The preview window, or "viewer", can be resized two ways. You probably noticed that dragging the middle bar will resize it up or down. You can also select "Viewer" in the Window menu and choose between small, medium, and large. (You can also use the Command key with "5", "6", or "7" to the same effect.)
If your clip thumbnails are too small or too big, the slider in the middle toolbar will resize them to your liking.

You can have big thumbnails,
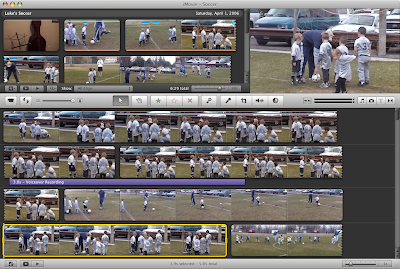
Or itty-bitty ones.
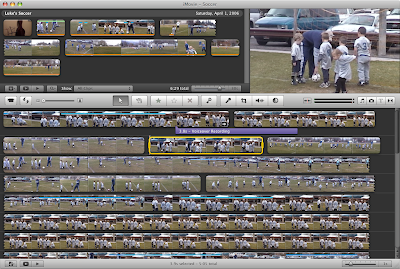
Tiny ones obviously help you see your whole project better. Big ones will help you find the particular point in your footage more easily. The size to which you set your clips will be reflected in the print-out if you decide to print them. ("Print?" Yes, you can print.)
Finally, if the fonts in your project or events lists are too small, you can make them bigger in the iMovie preferences.
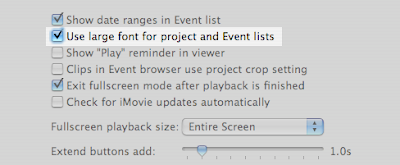
(* You earned bonus points if you knew that this section's title comes from a Jamiroquai song.)
Set it, but don't forget it.
You may be a creature of habit, but don't be needlessly stuck in just one way to view your movies. iMovie '08 wants you to shift it, swap it, and twist it around to suit the task at hand. Put this flexibility to good use by being flexible yourself. In then end, it will probably save you time and sore eyes.
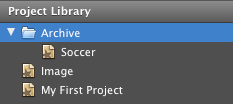
How to Use Project Folders
Having all of your projects at your fingertips is a great feature in iMovie. But what do you do when your projects start to pile up?
Apple was a step ahead on this one. iMovie '09 provides folders to organize your projects. These are just like the album folders in iPhoto or the playlist folders in iTunes. You can find them up in the File menu.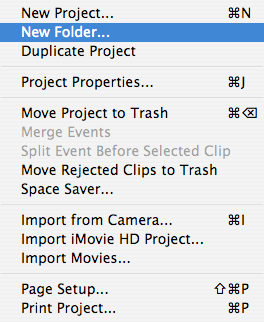

You can rename a folder by double-clicking on it.
The feature has several uses. It is a nice way to organize a group of projects I plan to add to a single DVD. As an added bonus, the Media Browser in other iApps will show the same folder structure that you set up in iMovie. I also use this feature to archive old projects. Hats off to Apple. This is a nice touch.