If you are like me, you'd rather go without than eat vanilla ice cream all by itself. Vanilla is a great platform for other, better desserts, but I don't like it much when it's all alone.
Not so with iMovie. If I can do something in iMovie, using only iMovie, I smile. So when someone asked if there was a way to add an image that would scroll with the credits, I had to try and do it in iMovie alone. Sure this could be done with more advanced software, but where is the fun in that?
This is how you can add an image to scrolling credits.
The Image
Okay, I guess I lied just a tiny bit. Before you can do the work in iMovie, you need an image set up for the effect. Since iMovie doesn't actually edit images, we will have to go somewhere else.
I decided to use something really simple, like Keynote. You can use any image creation software that is out there, and there are plenty that aren't Photoshop or Illustrator. For example, here is a free one called Seashore.
After creating a new presentation in Keynote, this is what I made on the slide:
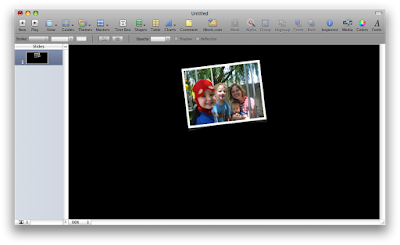
You will notice two things:
1. The image I want to scroll needs to be in the top half of the window.
2. The background should be the same color I want behind my credits. (It is possible in iMovie to use an image with a transparent background over top regular footage, allowing you to scroll the image and credits with video running in the background. We aren't going to go into that in this tip. If you want to do that, just add the transparent image as a cutaway over your video footage and follow the rest of this How To.)
If you are following along in Keynote '09, once you have created your image, choose Export from the Share menu. You want to export it as an image like I do here:
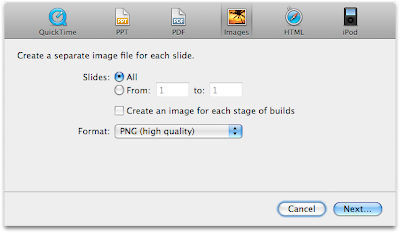
Once that is done, you should have an image that looks like this:

The Secret is Ken Burns
Now for the fun part. Before we add the credits, we want to add the image that will scroll with the credits. There are a number of ways get it into your iMovie project. The easiest is to just drag and drop. Once you have added your image, we need to apply a Ken Burns effect to it.
On the image that has been added to your project, you can see a little badge in the top left corner that looks like a broken box. Click on that badge, or on the button in the middle toolbar that looks just like the broken box badge. This brings us to the Crop tool.
Your preview window should now show your image with a red box and green box layered over it. The green one defines what your image looks like at the start of the effect and the red box defines what it looks like at the end. You can resize and move the red and green boxes with just two limitations:
1. They have a minimum size equal to one quarter of your image.
2. They always have to be filled with some part of your image, meaning that you can't place them outside the boundary of your image.
The way we get the scrolling effect is to manipulate the start and end points so they look like this:
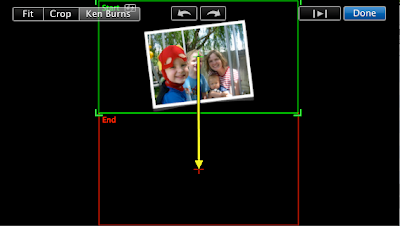
So with the start and end points going from the top to the bottom, our image will look like it is going from the bottom to the top. You can click the top-right arrow to preview the effect you are creating.
Now the Credits
Now we are going to add the credits, and the trick here is to make them scroll at the same speed as your image. To do this, I first add black space following the scrolling image. You can find and add black space by selecting the globe on the far right of the middle toolbar. This is where you get access to travel maps and textures. One of the textures is just a black screen, which you can drag into your project.
Now that I have the image and the trailing black space, I can add my credits. (Click the "T" button in the middle toolbar.) Drag and drop the scrolling credits onto any point in your project. Just make sure that a blue field shows you that the credits will be dropped onto a clip, instead of before or after it. (If you see a green line instead of a blue field, it means the titles are being added before or after clips, instead of on top of them.)
Now that your credits are added, you can resize them to cover both the scrolling image and the trailing black space. Hover your mouse over one one end of the clip, and the pointer changes into a vertical line with arrows on either side. This indicates that you will be dragging just the end of the title. Resize the title so that your project now looks something like this:
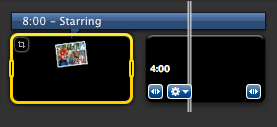
Now if you play your project, the image will begin on screen then scroll up followed by the credits you just added. A few things to remember:
1. The scrolling speed of your credits is determined by the length of the title plus the number of lines in your title.
2. You can tweak the timing of the image or the title by pulling up the inspector. This will allow you to sync the timing of each.
3. The title can only be as long as the clips in the project, so if you need more room you can lengthen your black space by adjusting the time in the inspector.
A Finishing Touch
I thought it would be cool to have the image hover for a moment before it begins scrolling. To do this, I just copy the clip with the image, and paste it back into my project. (When you paste something into your project, iMovie pastes at your playhead. If your playhead is in the middle of a clip, iMovie will split the clip and insert the pasted clip or image. In this case, make sure your playhead is at the very beginning of your scrolling image.)
I select the image I pasted in and go into the crop tool. The preview window shows me the same Ken Burns effect I had applied before. In this case, I just click the crop button in the top left corner of my preview window. The red box disappears and the remaining green box is already zoomed to the right spot. I can adjust the length of the hovering image in the Inspector.
Now I just add a fade through black transition to the beginning, and my project looks like this:
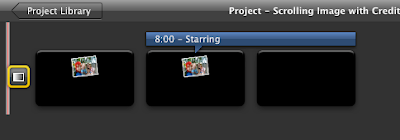
Here is the final product in video form:
Fun with Vanilla
If we get creative, we can do all kinds of cool things with just iMovie. If you have any cool tricks you do using only iMovie, please tell us about it in the comments or drop me a line.


9 comments:
Aaron,
Great tip. I wanted to see the final results, but the embedded youtube video is marked private and doesn't play. Let us know when that gets changed.
Thanks for pointing that out, Brad. You should be able to view it now.
Keynote 09 does some great animations, which I thought might be able to transition to iMovie. In Keynote, I put together 4 slides worth of animations (stars zooming in, etc) and exported it out as a quicktime movie. I had to do the extra step and convert it using quicktime pro but having the animation in the movie was well worth the extra step.
Dumb question: In Keynote 09, what is the best "slide size" to use for this effect? 1024 X 768? or larger?
Hi,
Here's my pseudo animation....
http://www.youtube.com/watch?v=wMrf_sd3gkA
I scanned images from a children's book I wrote, and used lots of Ken Burns and other effects to give the illusion of motion and change. Using iMovie only, I think my favourite effect is around 7 minutes, where the dove fades to black and white. I did this by splitting, then making the second half of the split part into black and white and then placing a slow fade transition between the two parts of the split.
http://www.youtube.com/watch?v=wMrf_sd3gkA
http://www.youtube.com/watch?v=wMrf_sd3gkA
Oops, in my previous comment I forgot to make my link into a link :-)
Nice slideshow video! This is a great project to do with students learning languages, or with encouraging your kids to appreciate literature (not to mention the fine art of filmmaking with iMovie!).
This isn't quite the ideal post to ask this question, but I can't find any other articles in this blog so far that have mentioned zooms and something like the Ken Burns effect, so here goes:
The Ken Burns effect (zooming from one crop of the frame to another crop) works great on still images, but what about zoom animations for video? Let's say I have a fairly fixed shot from a tripod of a busy street, but I want to give the impression that I'm zooming into something interesting in the top right of the frame. Is there a way in iMovie '09 to zoom video over time? (Yes, obviously this will result in some video degradation, but I feel the functionality must already be built-in, given how Image Stabilization works in iMovie.)
Thanks for any tips!
how would you add a video instead of an image for the credits?
Post a Comment