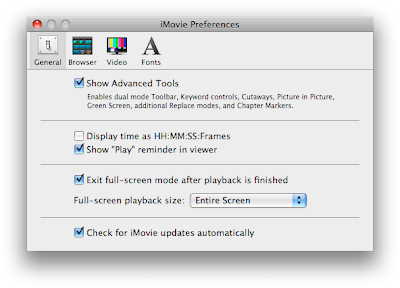
As you become more capable in iMovie, you may want to pay attention to this option at the top of the preferences window:
 The better I get at iMovie, the more I have come to appreciate the value of the Advanced Editing tools. With just a little bit of practice, you can significantly speed up how you edit.
iMovie tells you (in tiny little type) that this checkbox enables, among other things, the dual mode toolbar, keyword controls, and direct trimming. We'll just go through each of these tools and show you how they work.
Preface: The Single Mode Toolbar
Before you ever enable the advanced editing tools, there is a lot the toolbar can already do. This is what the non-advanced toolbar looks like:
 I will ignore the three buttons on the right for the purposes of this post. The four buttons on the left have different effects on the footage in your Event Browser.
The first button, the edit button, is essentially an alternative to dragging clips into your project. If you select a range of footage in your Event Browser, clicking this button will add the footage to the end of your project. You can get the same result by pressing "E" on your keyboard. Once footage is in your project, the corresponding footage in the Event Browser will show an orange line running along the bottom.
The second button, the solid star, marks the selected footage in your Event Browser as a favorite. Fav-ed footage will have a green line running across the top. Hitting the "F" key will do the same as clicking the Favorite button. This editing tool is especially useful if you have a lot of footage to sort through, footage you may not want to use but don't want to delete entirely.
The fourth button (yes, I know I skipped the third one) with the big X is the Reject button. This is not for marking footage involving your deadbeat brother-in-law. Instead, this button is for getting rid of footage you never intend to use. (So maybe it is for your deadbeat brother-in-law.) The letter "R" or Delete key on your keyboard are alternatives to this button. Rejected footage has a red line running along the top. Rather than getting into the Reject button's further uses, I am going to refer you to another How To:
How to delete a video clip
The third button with the empty star (see, I knew what I was doing) is the Unmark button. If you have marked Event Browser footage as a Reject or a Favorite, this button clears that away. The letter "U" will also unmark footage.
These tools beat out anything that iMovie HD had to offer in terms of sorting footage. But their power isn't limited to making little lines across your footage. In the bottom left corner of the iMovie window, you will notice this:
 That pull-down menu allows you to restrict the footage you see in your Event Browser. You can see only favorite footage. You can see favorite and unmarked footage, which is another way of saying that you don't want to see rejected footage. Or you can see only the rejected footage. You can also select these different options in the View menu. There is no way to see only footage that is in your project, presumably because you can already see that footage in your project, but I hope Apple adds this view in the future because I can think of situations where it would be useful, like making changes to all of a project's source footage for use in another project.
Ready for the final cool trick? If you have one long clip with only some of it marked, you can automatically select just the marked footage by clicking on the color bar in the clip. This makes selecting marked footage a piece of cake and was a nice touch by Apple.
All of your footage markings will stay in place no matter what project you are editing, with the obvious exception that footage marked with the orange line will differ from project to project. I think it would be very cool to have project-specific favorites, but I can see how this behavior could be confusing to a user who thinks favorite footage is always a favorite. Despite that minor complaint, all of these marking tools work pretty well. And so they should, when you consider that quick sorting and editing is the central design theme behind iMovie '09.
Part I: The Dual Mode Toolbar
So all of those marking tools are available without ever enabling the Advanced Editing Tools in the preferences. Enabling them turns the marking tools up a notch with "dual mode." The advanced editing toolbar looks like this:
 You'll notice two additional buttons. The key button is for keywords and will be addressed below. The arrow button is just for enabling the normal selection behavior you have already become accustomed to. This button can also be enabled with the Escape key on your keyboard.
So what is dual mode? It is basically a way to mark and edit footage by simply dragging the mouse. Think of it as a set of footage highlighters. The orange highlighter will add the footage to your project. The green one will mark it as a favorite. The red one will reject it. You also have your highlight eraser to remove red and green marks. To test this out, make sure no footage is selected in the Event Browser and click the "Favorite" button. You still scrub like normal with your mouse, but if you hold down the mouse button as you scrub, the footage you drag over will be highlighted green. Let go of the mouse button and the green line remains along the top of that footage. The "Edit", "Unmark", and "Reject" buttons all work the same way. In fact, if you really want to maximize the editing speed of iMovie '08, using the "Edit" tool in dual mode is scary-fast. Welcome to the new iMovie.
As mentioned above, you can always return to the normal clip selection behavior by hitting the escape key or clicking the arrow button. The other marking tools will work like normal as long as the arrow button is selected. Dual mode does take a little practice, especially if you are still getting accustomed to scrubbing in iMovie '08. With a little practice, however, the dual mode toolbar is worth keeping enabled all the time.
Part II: Keywording
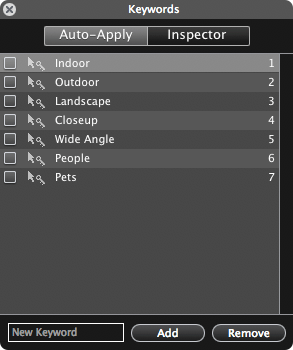
For you grammar buffs, "keywording" is a word now. After all, Apple has added "keywording controls" to iMovie '09. This takes your marking tools to a whole new level. If you click the key button in the advanced mode toolbar, you will get this floating window:

This is where you can mark up footage with specific words or phrases of your choosing. For example, say you wanted to identify all footage that contains an annoyingly exuberant soccer mom, you could add "soccer mom" to your list of keywords and mark all footage with her in it. It's footage you don't necessarily want to reject, but it certainly isn't your favorite. This is where keywords help.
Enough of the concept. How do these actually work? You'll notice in the aforementioned window that there is an "Auto-apply" tab and an "Inspector" tab. The "Auto-apply" tab works just like our highlighter versions of the other markup tools. You select the keywords you want to apply and click-drag to highlight the appropriate footage. If you want to add keywords to your list, you enter them into the text field at the bottom of the "Keywords" window.
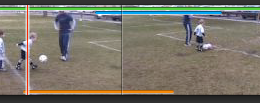
The "Inspector" tab only works if you have already selected a stretch of footage. If you have some footage selected, it will show you what keywords have been applied to that footage and allow you to add more keywords by checking boxes or typing in the text field at the bottom of the "Keywords" window. Whether you added keywords with the "Auto-apply" tab or the "Inspector" tab, all footage with keywords applied will have a blue bar running across the top, but just under where the green favorites and red reject bars are found. This clip has a green, a blue, and an orange bar showing it is a favorite, has a keyword, and is used in my project.

Also notice that while you cannot mark clips in your project as favorites or rejects, you can mark project clips with keywords. Doing this will also mark the corresponding footage in the event browser with the same keywords. (Remember, iMovie '09 works by referencing source footage instead of making copies of it. This is why a keyword applied in your project will also be applied to the source footage.)
Now for the really useful part. Once you have applied keywords to various lengths of footage, you can tell iMovie to only show footage that has been marked with a specific keyword. You do this by clicking on the new magnifying glass button that showed up in the bottom left corner of your iMovie window when you enabled the advanced editing tools.
 This button opens a pane in your Event Browser that lists all of the keywords in your selected footage and allows you to turn keyworded clips on and off with a red-light, green-light set of buttons. You'll notice that excessive shake footage is also automatically marked and can be turned off.
 Two more cool little tricks before we finish discussing keywords. In the "Keywords" floating window, you may have noticed numbers next to each keyword. You can tag clips more quickly by just typing the numbers that correspond with the proper keyword. Even cooler, if you press the number Zero on your keyboard, it will clear all keywords from the selected footage. The other cool trick is that you can organize your keywords in whatever order you want by dragging the words inside the "Keywords" floating window. Notice that the number shortcuts will always be in order, no matter how you reorder your keywords.
Conclusion: When "advanced" really means "organized"
So many of the advanced editing tools are more about efficient and convenient organization than anything else. In the end, this is what makes iMovie '09 advanced: quick editing, powerful organization, and all of this at your fingertips.


5 comments:
Thanks for the tips, Aaron! I really should learn to make use of those organizing tools. I was up until 2AM playing with iMovie 09 last night, and a good chunk of that time was spent trying to figure out how to use precision editing tools efficiently, and exporting 1080i clips to a 720p movie without interlacing (and resorting to JES Deinterlacer).
Anyway, here's my first video ever produced in iMovie 09 for anyone who cares for a peek!
Lightbulbs are going on...thank you!
Good Morning,
I'm trying to make a video, I've had iMovie products for years and I've had no problems.
With iMovie 09 however the Inspector function isn't coming up. When I double click the clip it plays the movie and pressing "I" brings up the camera.
Also when I press the "key" in the tool bar the auto-apply side of the window works and pressing the Inspector does nothing.
I have had a bit of look around on the net for the answer but this issue does not seem to come up. Any suggestions?
Cheers.
Melbourne Australia
Hi Aaron!
Wondering if you can help me here! I imported some home videos from mini DVDs. After import I noticed that the clips are not in correct order. Start footage in the middle, end footage in the beginning, so on. I tried to drag'n'drop to rearrange the clips but nothing happens. Is there a way to fix clip order?
Thanks,
Tariq
Hi, Aaron,
REALLY hope someone can help me with this as it's been bothering me for quite some time and I've spent a lot of time looking for the answer.
I use keywording a lot in iMovie '09 (8.0.6) and I would like to alphabetize them in the Inspector window to quickly find the ones I'm looking for when keywording newly-imported clips.
I did this once (time-consuming method of dragging around scores of keywords) and later had to trash the .plist and lost all that work :(
Any easier way??? PLEASE help!
Deborah
Post a Comment