Quick Tip: Mouse Wrapping

|

So traditional editing timelines scroll endlessly to the left or right. iMovie '09 breaks tradition by wrapping the timeline vertically when it gets to the end of the window, much like text wraps in documents. This really isn't the big deal some people make of it, but it does take some getting used to.

iMovie '09 gives ground to those still adjusting with this cool little trick: When dragging an element horizontally, iMovie will magically wrap your mouse cursor as though you were dragging in a traditional timeline. Think of it as having a mouse wormhole at the end of every line of clips.

To test this, grab a title in one of your projects. Drag the title to the right, and when you get to the end of that row of clips, keep dragging to the right. Poof! You mouse cursor automatically moves to the beginning of the next line and you can just keep on dragging.

This seems to work when dragging the following elements:

  • A title, either the entire thing or just the ends of it;
  • A background audio track;
  • A sound clip, either the entire thing or just the ends of it; and
  • The yellow selection border of a clip that wraps to a new line. (This works in the Event Browser, too.)
You can still drag these items vertically, if you prefer.

This doesn't work when dragging to relocate:
  • A clip or part of a clip;
  • A transition;
  • An image; and
  • A travel map.
UPDATE: Someone else pointed out another really cool trick. Hold down the Shift-key, or turn on Caps Lock, and your mouse will always wrap to the next line.

Read More...

Quick Tip: Split a Clip at the Playhead

|

This Quick Tip should make a lot of iMovie HD holdouts happy.

(By the way, you really shouldn't hold out any more. iMovie '09 is great.)

Most of us who have been in iMovie for a long time learned to edit with the "Split Clip at Playhead" command. The truth is that it is an awkward way to edit. To get at a bit in the middle of clip, you have to trim off the front, delete the bit you trimmed, then trim off the back, then delete the other bit you trimmed. (Not to mention, "Wait, did I delete the wrong bit?") This isn't a rock sculpture. Why should I have to chisel my video out?

Hey, old habits are hard to break. Plus, splitting a clip at the playhead is really useful for other things, like when you want to make audio level changes to part of a clip. (Remember, iMovie '09 applies audio levels across an entire clip, so you have to break a clip into pieces to change audio levels for the right parts.) If I could just skim to a spot then split, it would make editing just a little bit easier.

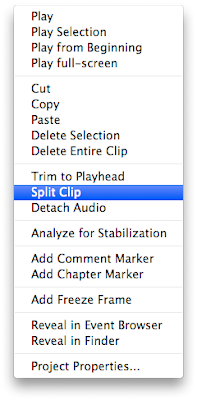
Well, iMovie '09 makes this possible. Skim to a split-worthy point in a project and right-click (Command-click for you one-buttoners). iMovie will select the entire clip, but don't let that throw you. Choose "Split Clip" from the shortcut menu that appears.

Huzzah!

Note: This command works differently if you select just part of a clip. If your little yellow borders aren't surrounding the whole clip when you do this, iMovie will split the clip at those yellow borders instead of at the playhead.
This tip only works in project footage, not event footage. But there is not much point in splitting event footage, so no problem there.

Read More...

How to Add an Image to Scrolling Credits

|

Vanilla.

If you are like me, you'd rather go without than eat vanilla ice cream all by itself. Vanilla is a great platform for other, better desserts, but I don't like it much when it's all alone.

Not so with iMovie. If I can do something in iMovie, using only iMovie, I smile. So when someone asked if there was a way to add an image that would scroll with the credits, I had to try and do it in iMovie alone. Sure this could be done with more advanced software, but where is the fun in that?

This is how you can add an image to scrolling credits.

The Image
Okay, I guess I lied just a tiny bit. Before you can do the work in iMovie, you need an image set up for the effect. Since iMovie doesn't actually edit images, we will have to go somewhere else.

I decided to use something really simple, like Keynote. You can use any image creation software that is out there, and there are plenty that aren't Photoshop or Illustrator. For example, here is a free one called Seashore.

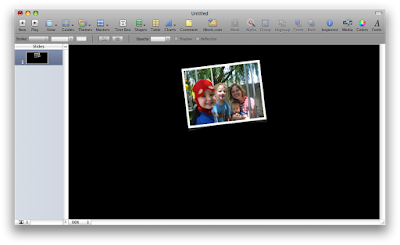
After creating a new presentation in Keynote, this is what I made on the slide:

You will notice two things:
1. The image I want to scroll needs to be in the top half of the window.
2. The background should be the same color I want behind my credits. (It is possible in iMovie to use an image with a transparent background over top regular footage, allowing you to scroll the image and credits with video running in the background. We aren't going to go into that in this tip. If you want to do that, just add the transparent image as a cutaway over your video footage and follow the rest of this How To.)

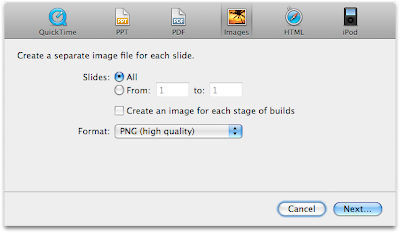
If you are following along in Keynote '09, once you have created your image, choose Export from the Share menu. You want to export it as an image like I do here:

Once that is done, you should have an image that looks like this:

The Secret is Ken Burns
Now for the fun part. Before we add the credits, we want to add the image that will scroll with the credits. There are a number of ways get it into your iMovie project. The easiest is to just drag and drop. Once you have added your image, we need to apply a Ken Burns effect to it.

On the image that has been added to your project, you can see a little badge in the top left corner that looks like a broken box. Click on that badge, or on the button in the middle toolbar that looks just like the broken box badge. This brings us to the Crop tool.

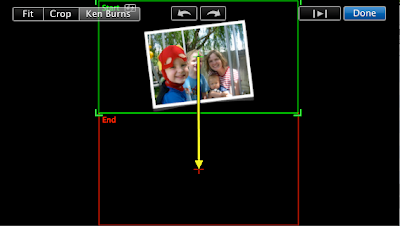
Your preview window should now show your image with a red box and green box layered over it. The green one defines what your image looks like at the start of the effect and the red box defines what it looks like at the end. You can resize and move the red and green boxes with just two limitations:
1. They have a minimum size equal to one quarter of your image.
2. They always have to be filled with some part of your image, meaning that you can't place them outside the boundary of your image.

The way we get the scrolling effect is to manipulate the start and end points so they look like this:

So with the start and end points going from the top to the bottom, our image will look like it is going from the bottom to the top. You can click the top-right arrow to preview the effect you are creating.

Now the Credits
Now we are going to add the credits, and the trick here is to make them scroll at the same speed as your image. To do this, I first add black space following the scrolling image. You can find and add black space by selecting the globe on the far right of the middle toolbar. This is where you get access to travel maps and textures. One of the textures is just a black screen, which you can drag into your project.

Now that I have the image and the trailing black space, I can add my credits. (Click the "T" button in the middle toolbar.) Drag and drop the scrolling credits onto any point in your project. Just make sure that a blue field shows you that the credits will be dropped onto a clip, instead of before or after it. (If you see a green line instead of a blue field, it means the titles are being added before or after clips, instead of on top of them.)

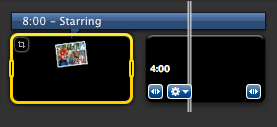
Now that your credits are added, you can resize them to cover both the scrolling image and the trailing black space. Hover your mouse over one one end of the clip, and the pointer changes into a vertical line with arrows on either side. This indicates that you will be dragging just the end of the title. Resize the title so that your project now looks something like this:

Now if you play your project, the image will begin on screen then scroll up followed by the credits you just added. A few things to remember:
1. The scrolling speed of your credits is determined by the length of the title plus the number of lines in your title.
2. You can tweak the timing of the image or the title by pulling up the inspector. This will allow you to sync the timing of each.
3. The title can only be as long as the clips in the project, so if you need more room you can lengthen your black space by adjusting the time in the inspector.

A Finishing Touch
I thought it would be cool to have the image hover for a moment before it begins scrolling. To do this, I just copy the clip with the image, and paste it back into my project. (When you paste something into your project, iMovie pastes at your playhead. If your playhead is in the middle of a clip, iMovie will split the clip and insert the pasted clip or image. In this case, make sure your playhead is at the very beginning of your scrolling image.)

I select the image I pasted in and go into the crop tool. The preview window shows me the same Ken Burns effect I had applied before. In this case, I just click the crop button in the top left corner of my preview window. The red box disappears and the remaining green box is already zoomed to the right spot. I can adjust the length of the hovering image in the Inspector.

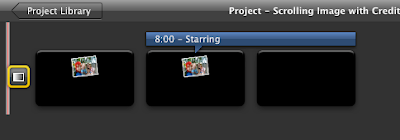
Now I just add a fade through black transition to the beginning, and my project looks like this:

Here is the final product in video form:

Fun with Vanilla
If we get creative, we can do all kinds of cool things with just iMovie. If you have any cool tricks you do using only iMovie, please tell us about it in the comments or drop me a line.

Read More...

Quick Tip: Double Click

|

Apple has changed the effect of double-clicks with iMovie '09. In the previous version of iMovie, double-clicking would start previewing the clip from the point of the cursor. Now double-clicking will do all of the following:

1. If you double-click on the body of a clip, title, transition, map, or sound track, iMovie brings up the Inspector window.

2. If you double-click between clips (and not on a transition) in a project, iMovie shows you the precision editor for that cut.

3. Also in a project, if you double-click on the time of a clip (the little numbers on the left side of the clip), iMovie gives you the Clip Trimmer window.

4. Double-clicking on a chapter or comment marker allows you to edit the text of the marker.


If you notice any other useful changes to iMovie mouse clicks, please share them with us in the comments!

Read More...

How to Edit to the Beat

|

Just looking at the title to this post makes me think of some sort of nerd version of a Gloria Estefan song. Hmm. Come to think of it this post is especially well suited for Gloria Estefan songs.

What follows is, in my opinion, the one feature that should have been demoed at MacWorld but wasn't. Seriously, this feature is awesome. Here is how to edit to the beat of a song.

Like I said, this feature didn't get much attention at MacWorld, and I am stunned that it hasn't gotten more attention since. We all need it and will use it. My rigorous (entirely anecdotal) survey (sample of 1) of home video projects reveals that most of us don't make home videos, we make home music videos. And it's no wonder. Kids running around Disneyland are a lot cuter if they are doing it to Bibbity Bobbity Boo.

Enter iMovie '09 and the beat marker. To sum up how this works, iMovie will now allow you to premark beats (or any point in an audio track for that matter) so that footage and photos will autofit to the beats you mark. This feature, by the way, has a serious wow-factor as you actually use it.

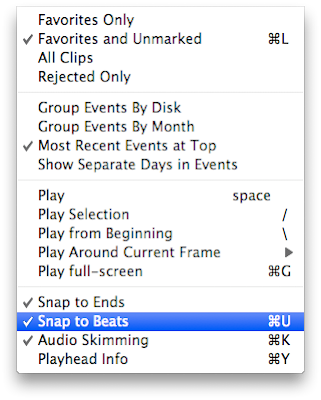
Before you do anything, though, click on the View menu and select "Snap to Beats", or just hit command-U.

Pick a Track, Any Track.
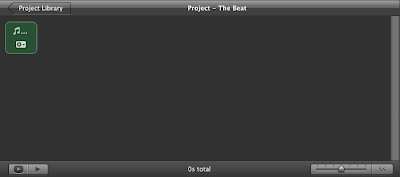
Start a new project then add a song to it. Once you've done this, your project will look a lot like this.

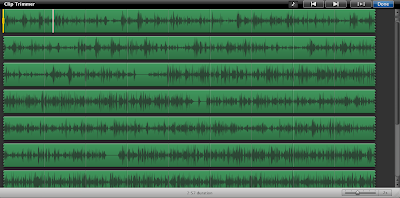
Experienced iMovie users will recognize that the song won't go anywhere without a video track, as iMovie automatically ends your project when the video ends (and not when the song ends). But this doesn't mean that you can't do stuff to the song in the meantime. If you click the gear icon on the track, you can select "Clip Trimmer" from the menu that appears. Once you do, your event footage is replaced by a window that looks something like this:

Pay particular attention to that little music note in the top right corner. That is a draggable beat marker, which works just like chapter markers and comment markers. Dragging is great and all, but I find it a lot simpler to just hit the "M" key on the keyboard. Alternatively, you can right click on the spot you want to mark and choose "Add Beat Marker" from the menu that appears. The actual markers appear as thin, vertical, white lines with a dot in them.

Now here is where it gets pretty fun. Start the audio track playing from the beginning. As the song plays, just tap the M key for every beat where you want to cut to a new shot. Go ahead and boogie while you do it. No one is watching.

Once you have done this through the whole song, you can take a moment to fix your mistakes. For the beat impaired, the handy soundwaves can often point you to the right spot. Beat markers are draggable even after you have placed them. You can remove them entirely by dragging them off of the top or bottom of the Clip Trimmer window. If you want to start over, just right click and choose "Remove All Beat Markers".

A useful tip: Usually if you are cutting right on the beat, your video cut will actually appear to be late. If you can practice tapping the beats just barely before the beats, your cuts will look just right.

Also, don't group your beat markers too closely together unless you are trying to get a very fast-paced effect. Once you are happy with all of the beat placements, click "Done" in the top-right corner of the Clip Trimmer.

Video Goes Here
You should be back in your Event Browser now, having a basically blank project awaiting some footage. Go ahead and select a length of footage then add it to the project above.

Voila. There it is. iMovie cut the end off the footage you selected and added it to the project. Try it with a photo now. Isn't that cool?

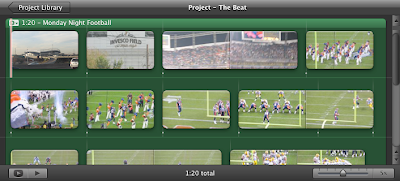
After very little work, you will have a project that looks something like this:

Notice how the beat markers show up in your project to remind you why the cuts are taking place there. Having them show up directly in your project allows you to refer to them in case you want to edit around them or want something in the middle of a clip happen at the beat. (Notice how in the second line on my project I extended a clip through one of my beat markers.)

What if the video isn't showing exactly what you want when the cut takes place? Not a problem. Just select the gear icon on the video clip and choose "Clip Trimmer". There you will be able to move the edit left or right to make sure you are seeing what you want to see. Just don't adjust the time unless you want to override the beat marker.

Not Just for Cuts
Beat markers work with pretty much everything else you might do in your project:
1. Titles, either the beginning or end of them, will be magically drawn to beat markers. This is also true of cutaways.
2. Layover audio tracks that display as flags under your video, in addition to the background-style audio track I used, work with beat markers as well. Beat markers inserted into layover tracks will snap to the beginnings and ends of clips, titles, cutaways, etc.
3. Beat markers even have the same effect in the Precision Editor.

Mistakes Were Made...
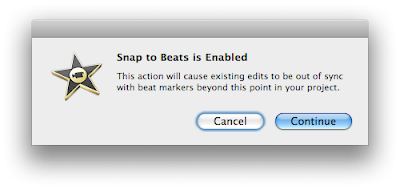
One of the really annoying things about previous iMovie versions is that as you edited to the beat manually, a tiny change would have cascading consequences. Multiple edit points could be thrown out of whack. iMovie '09 tries not to let that happen. If you adjust or delete a clip, you get this message:

It's nice to be warned, but iMovie will continue to warn you as you make changes. The dialog will stop appearing once you turn off Snap to Beats from the View menu.

Fun AND Functional
Before beat markers, editing a movie to music was pretty time consuming. Beat markers in iMovie '09 are a big time saver, but also pretty fun.

Enough of this, back to your boogie.

EDIT: Per Nathan's request in the comments, I uploaded my project from this post to YouTube. The shakiness of the footage is explained by the 10x zoom in the tiny camera I was shooting with (a Canon TX1). That, and an absolutely crazy stadium crowd.

(For those into football, this was the October 2007 Monday night game between Denver and Green Bay. Denver staged a last minute comeback only to have Brett Favre throw a 78-yard touchdown pass in the first play of overtime. I left that out of the video on purpose.) :P

Read More...